Headviant
Not just fun and games
So, to be clear, this is nothing deviant-related. Nothing kinky or fun. I'm posting it here because I want everyone need to know about it. (I suppose a lot of you probably already do. I'm actually quite late to this.)
Want to spend half a day meaningfully? Go watch this new Netflix series.
If you don't know about it, don't look what it is, don't look for spoilers, just go watch it.
And hey, I know people do this all the time, where they tell you to do/watch/buy something without thinking about it. In fact I hate it, but in this case, the series deserves an exception.
Well! It seems I found my theme song
Cute, isn't it?
Dead Island Deviant Edition
Have to say though, The Dead Island Riptide Zombie Bait Edition gave me some pause and I kinda want it, even though I'm ired of everything that contains zombies, so I don't care for the game itself. It's just a nicely sick piece of deviant scultpure even though it was probably created only to get into the headlines.

Needless to say, the edition caused quite a bit of controversy, and game magazines were racing to find the best insult for anyone who felt anything but disgust for it; never mind for anyone who'd dare to buy it. Well, I still like it. I think.
In a fairly adorable detail, the bikini came with different flags, so you can have a version with Union Jack or Le Tricolore if you feel (anti-)patriotic. I've not seen any other variants. Personally I've always thought the UK flag looks extra cute on a bikini.

(From a Dead [see what I did there] YouTube channel)

(From L'Antre d'Arnod)
More deviant videogame journals:
Serious Sam
Red Dead Redemption
Lollipop Chainsaw
SOMA
The Wolf Among Us
Sit down, and listen (i.e tutorial time)
Apologies in advance for the creepy language, but it's hard to avoid when covering a topic like this in a tutorial.
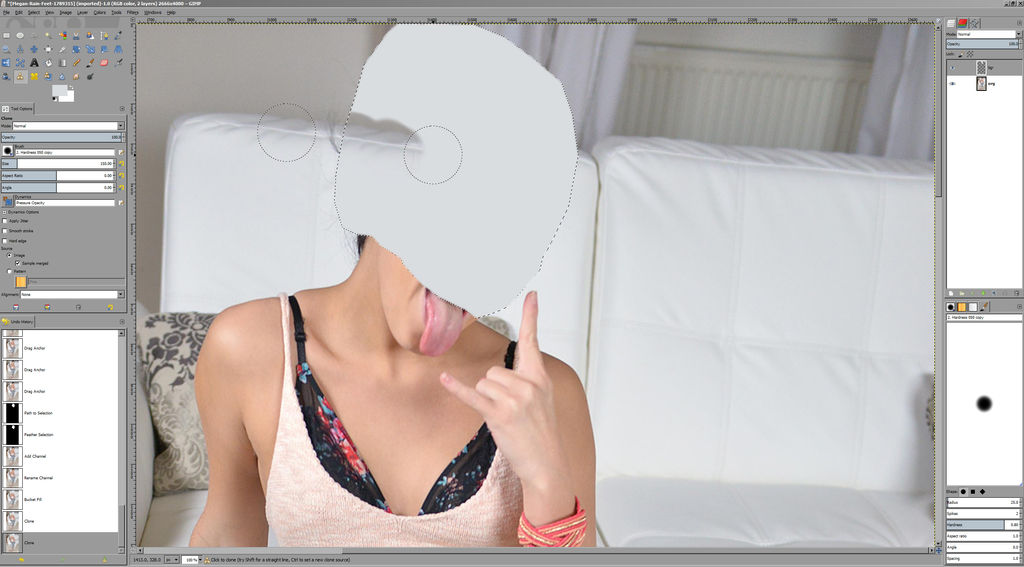
You won't be surprised the most used tool is the Clone Tool. Other than that, I use layers and paths. I don't use masks since I find them a pain to work with and they aren't really needed for this purpose. I also don't bother with color profiling and a lot of other stuff that's normally part of a good workflow. It's not like I'll be putting these pics in my portfolio, right? So it's kinda quick and dirty.
The software used here is GIMP, which is free, rather cool and multi-platform. That said, the tools described here are included in every decent graphics editor (by which I don't mean MS Paint or IrfanView, but something that has some actual editing tools). If you want to use GIMP, make sure to switch to a single-window interface to keep your sanity. No, there's no discussion about it.
If you're new to editing graphics, I suggest you familiarize yourself with paths. They can be a bit tricky and abstract at first but are very useful. Especially for cutting and pasting entire objects, removing backgrounds or creating boundaries for the brushes. They are one of the best ways to copy an outline of a complex object.
When working with layers, always remember to make sure you're editing the right layer. GIMP and other apps of this sort allow you to edit layers you don't see because they're covered by other layers, and that can get messy.
The manip described here is on the easy side and would take about half an hour to complete. Unfortunately I did mess up a few things, especially the skin tone color (plus a few odd bugs). A good advice is to often check how the image looks as a whole with low magnification. Often issues aren't apparent in 100% view. So this example isn't as good as it should've been. But well, I did make the screenshots doing this manip and not the others so here goes. At least I can describe what I know I messed up.
Also, most of the steps are really trial&error so you may witness how I first went for one thing, then changed it later after finding the original way didn't work.
So here's what we're going to do:
I. Off with her head
II. Recreate the background
III. Clean up the background (stray hair, color matching etc.)
IV. Model the new neck
V. Recreate the skin texture of the new neck
Class, meet Megan, our lovely... er, volunteer for this lesson. Ain't she a doll? You can find the original photos used here under Megan Rain on wikiFeet.
I. Off with her head, i.e. limiting edits to the head area
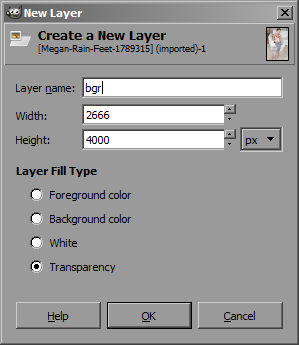
1. Create a new layer and rename it to something sensible, e.g. 'couch' or 'head' or '1' or whatever. Here I named it 'bgr' but later renamed to 'couch' I also tend to rename the original layer to 'org'. From now on, don't touch the original layer. It will be useful later for copypasting pieces of the original image or for reference.
It's just good practice to have some order in the layers at least at the beginning.

2. Read notes in step 6 for explanation why I do this part.
Select the Path tool and make a path around the girl's head. You want to stay fairly close, but you can keep some stray hair etc. out for later cleanup. If you want to keep the neck intact, you can leave it out of the path, at least the part that seems useful. In this case, Megan's open mouth is covering the right side of her neck, therefore that part will not be useful and can be removed outright - hence it's included in the path.
Originally I intended to reuse the left side as-is, that's why it's not inside the path. As you'll see further, eventually I decided to paste from a different image instead, but this is how I started.
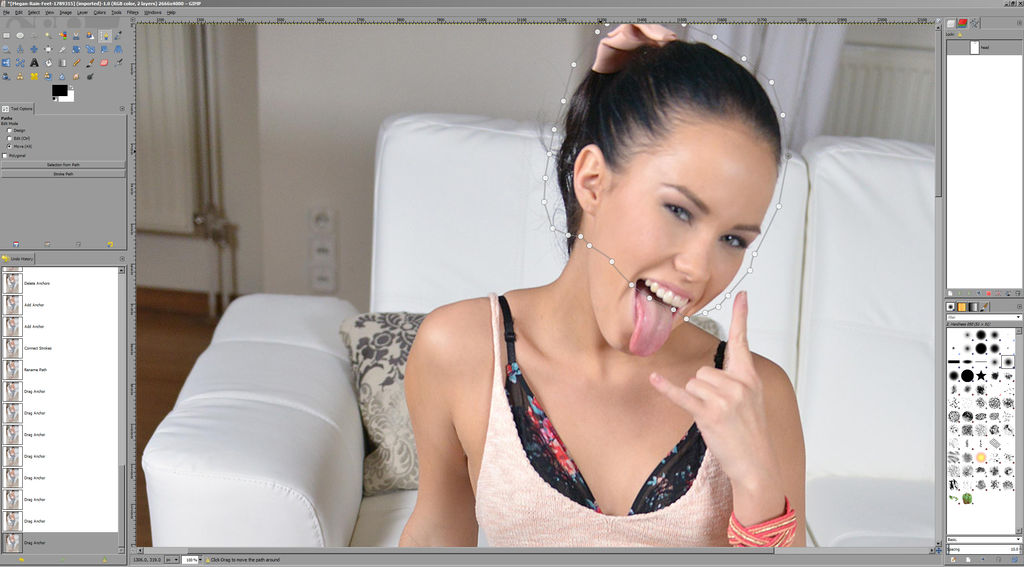
3. Rename the path e.g. 'head'
4. In the menu, go to Select > From Path and then Select > Feather. Enter a value between 3 and 10. Since this is a large image and the background seems easy to work with, I used 7 (ignore the value in the screenshot). Smaller values work for smaller photos or very easy backgrounds (like sand or a plain wall), larger for the opposite.

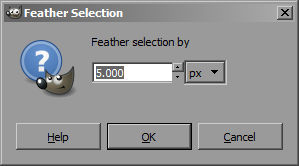
Feather basically just adds blur to the edges of the selection, so it's not sharp and aliased.
5. Use Select > Save to Channel and rename the new channel, e.g. 'head'. This step is not really necessary, but if you need to go back to the selection later, it's faster selecting from a channel than always having to select from the path.


6. Switch back to the Layers tab and your working layer ('couch')! If you stay in the Channels tab, you'll be editing the channel and not the layer.
In fact, always keep in mind to make sure you're editing the right layer. It's very easy to forget and make edits to something else. Always click the layers tab and select the right layer.
- Why do I even bother with creating the original path/selection and not just clone straightover the original? First, because it helps me visualize the result. Second, I want to work only inside the selection to avoid making too much mess everywhere. It depends on the background and overall difficulty. If the background is simple, such as grass or water, there isn't much hair etc., you can get away just cloning over everything, but most of the time it's a good idea to stay inside a single area for the time being.
- For example, if the model on the photo has her hand over her face, you want to keep the hand out and therefore create the path copying the hand. It's not the case here though.
7. To better visualize the result, I tend to fill the selection with a single color or gradient related to the background. It's not necessary though and you can just start cloning or copypasting right away.
Select the Color Picker tool, tick Sample Merged and pick the color of the couch. If you don't tick Sample Merged, you won't be able to select any color because you're working with a blank layer. Sample Merged takes the color of the pixel as you actually see it on your screen.
Then select the Bucket Fill and throw the paint at the selection.
Alternatively, pick both foreground and background colors from the left and right side of the selection and fill the selection with gradient. It works remarkably well fairly often. It's useful on images where light comes from one side and thus the background is darker on the other side.
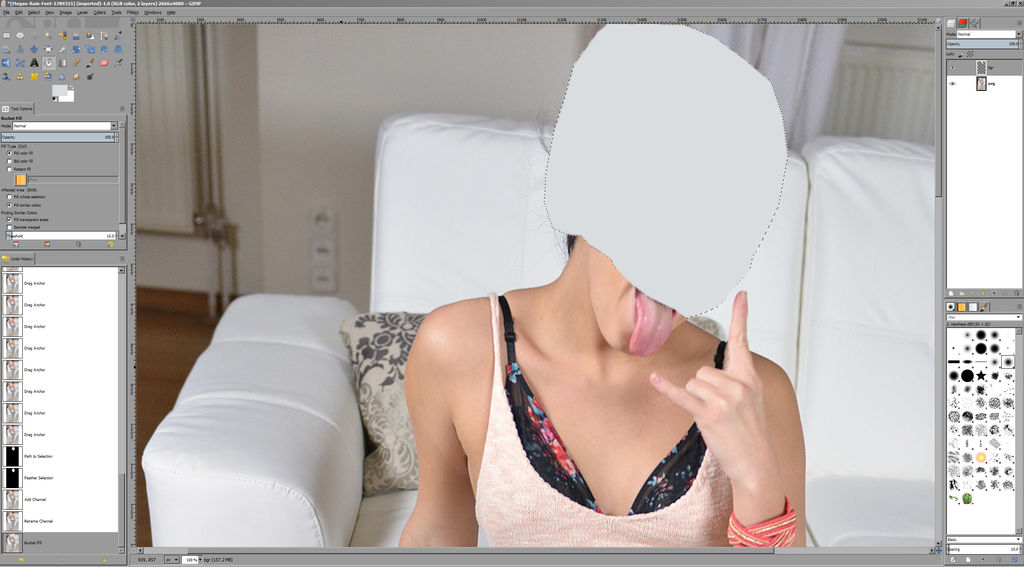
II. Recreate the background
The background looks simple enough so a clone tool will do. We're staying inside the selection and the layer 'couch'.
1. Select the Clone Tool and again tick the 'Sample Merged' option.
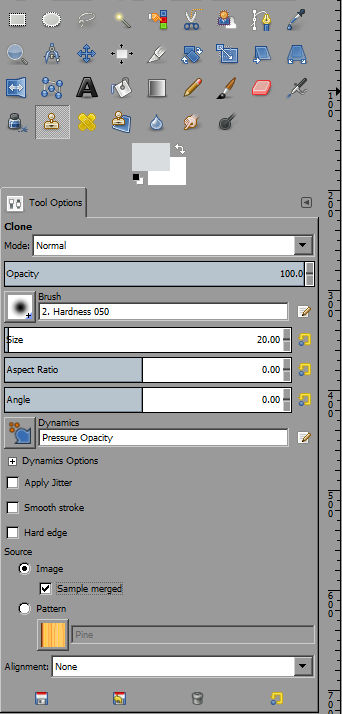
2. Let's find the right brush. A good default for broad strokes is something with hardness between 0.30 and 0.80. Always set the spacing to 1. Size doesn't matter in this instance since it's selected in the clone tool setup, but you can also keep several brush sizes as handy presets.

The screenshot shows 0.80 but I soon realized lower hardness will work better so I changed it to 0.50. It's a good starting value. You'll probably just go lower from here.
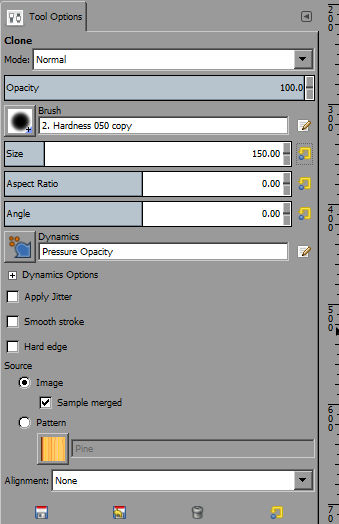
3. Back in the Clone tool options, pick the right brush size for the job. Here for a large image and for broad strokes, I picked 150. Leave opacity at 100 for the moment.
4. Start cloning. Select the background to clone from by holding Ctrl and clicking, than paint using the mouse.
Some pointers:
- At least when starting, select a piece of background with a distinct line, in this case the seam of the couch. Use it as reference, i.e. when selecting the background, point your mouse exactly at the line. Then when painting, point the mouse exactly where you want to place that line.
- Start painting from the edge of the selection, so you can see if the line continues seamlessly. If you miss and the line becomes jaggy, just click again to fix it, or use Undo.
- If you're satisfied with the line placement, keep holding the mouse and paint (in this case) up and down to fill the space above and below the line.
- Use short strokes. If you use long strokes, something is going to mess up. On the other hand, if you just click and don't drag at all, you'll have a very clear repeating fake-looking pattern. Short strokes combined with a soft brush can create enough faux detail that it looks sufficiently real.
- If the line doesn't go in the direction you want to, you can skew it a bit fairly easily. Select a brush with less hardness (0.05-0.30) and paint, moving the line a bit up or down. You can then touch it up further with a smaller brush.
- Clone from multiple backgrounds, not just from one spot. In this case. I'll paint the left side of the selection with the left side of the couch and the right side with the right side of the couch. If your background is e.g. grass or water waves, clone from different parts of the image. Otherwise it's going to look fake.
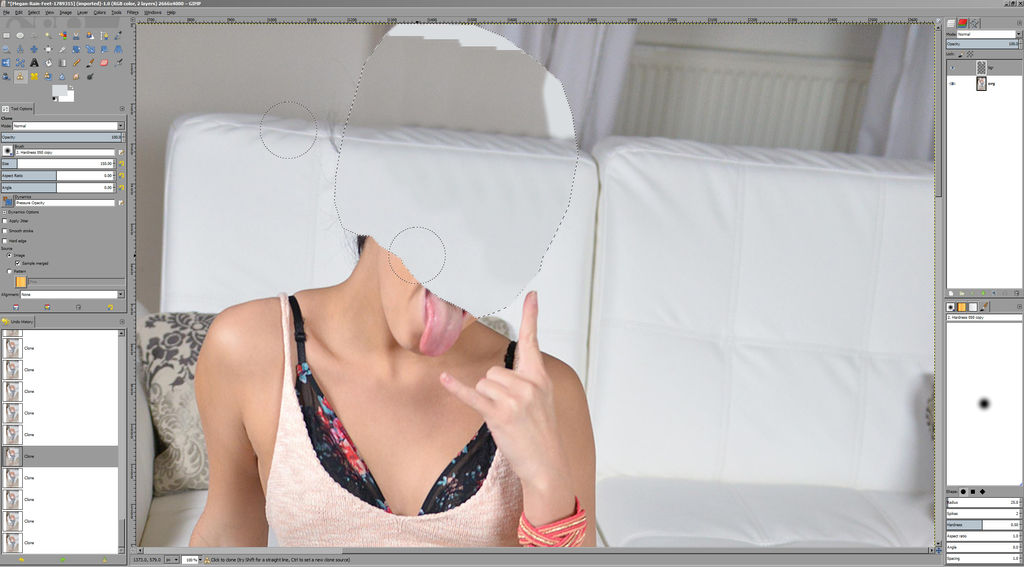
6. Shading is an issue here. The right side of the selection should be much lighter than it is, to match the couch. Normally I'd try to clone with a smaller brush from close proximity, but that doesn't work here either, because the background is too uniform and a small brush would just make weird pale lines all over the place instead of lighting up the whole area.
Since the couch is just white anyway, let's make it easier.
- Select the couch color with the Color Picker
- Select the Airbrush tool with opacity at 50, brush size at 200 and brush hardness at 0.50 or lower.
- Click around the selection, picking the color with the Color Picker from the spot you want to 'copy'. The couch will lighten up.
III. Clean up the background (stray hair, color matching etc.)
1. Cleanup will require working outside of the original selection. Let's start with the curtain. Deselect the selection (Ctrl+Shift+A), create a new layer (named 'curtains' here) and clone what you can. There isn't much to work with, so I decided to fake it, end the curtain prematurely and just clone the wall. If I weren't lazy, I could copy and paste the curtain from another image in the series, or at least multiply the existing piece of the curtain, or use some other tricks. But this will do.
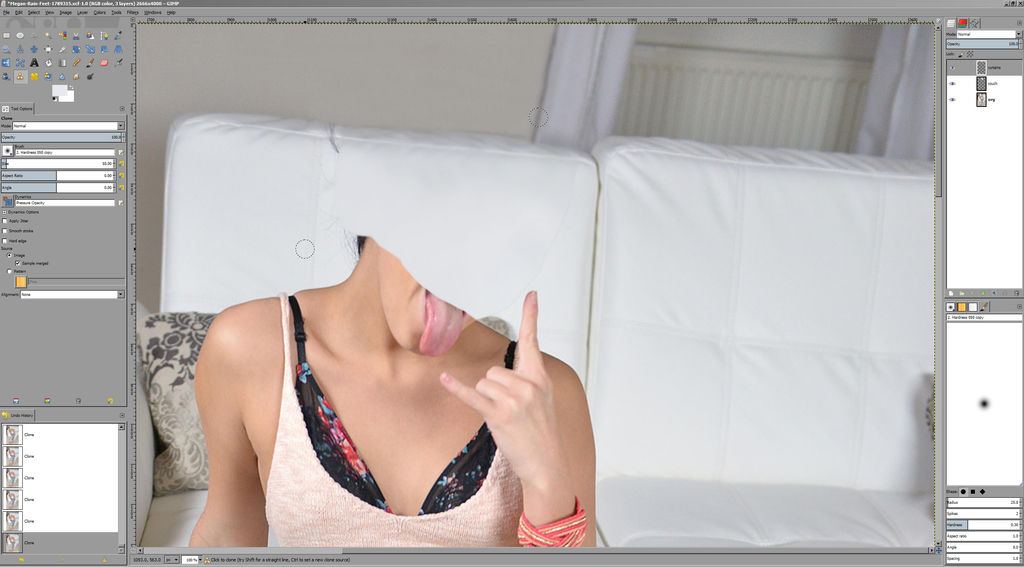
2. Clean up the other stuff that seems wrong around the edge of the selection. I mostly used the clone tool with size 70, 0.3 hardness and 0.50 opacity for this.
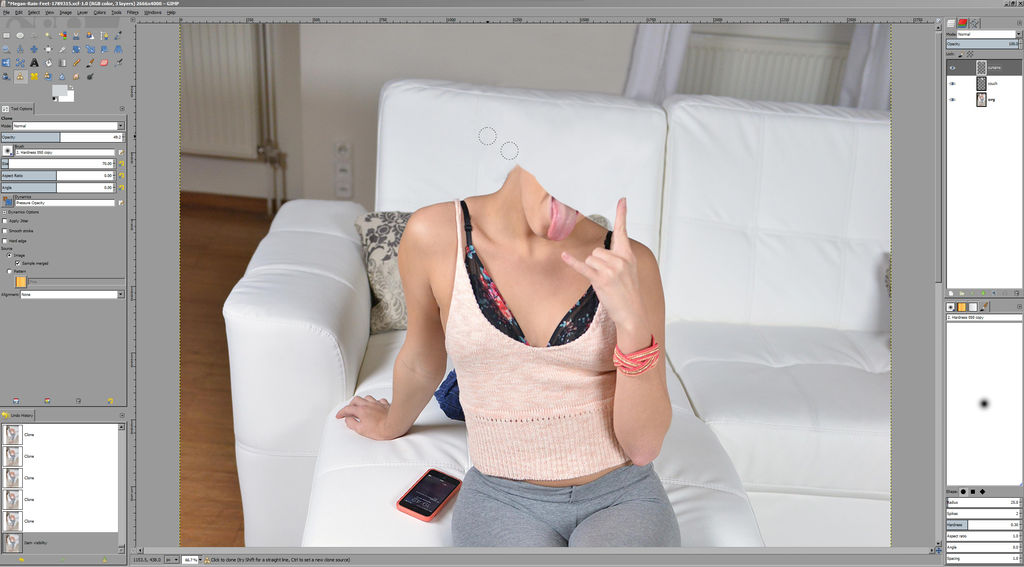
3. There's detail on the couch that's missing, a seam that was hidden behind Megan's head. Easy fix here, just copy it from another part of the image. Use one of the Selection Tools, whichever is handy at the moment. For me it's usually the ellipse but this time it's the rectangle. Select a seam from another part of the couch
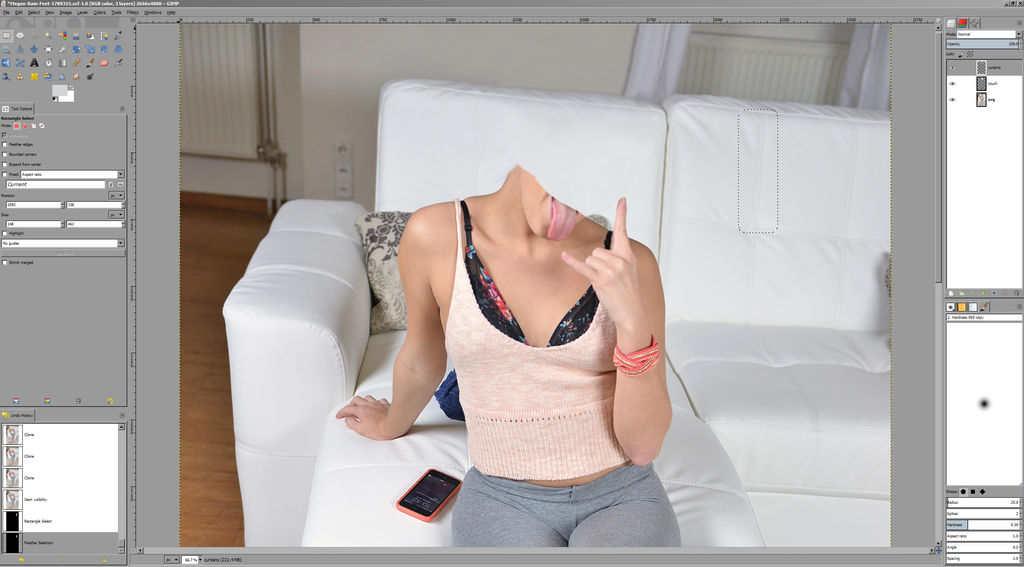
and use Select > Feather with the value of at least 50 (here I used 100 eventually). Then Ctrl+Shift+C to or Edit > Copy Visible (i.e. across all layers) and Ctrl+V, which will paste a floating layer. Click the New Layer icon in the Layers toolbox to convert the floating layer to a regular one and rename it. (Alternatively use Edit > Paste As > New Layer.)
4. Use the Move Tool to move the seam above her shoulder. Thanks to using a large Feather value, it drops in nicely. I used the Eraser tool with brush 100 and 0.05 hardness to delete parts interfering with the rest of the image.
Also, try to place it correctly, not like me - mine is too much to the right :/ I don't know where my head was at the time.
Note: this whole part (couch detail) would be more useful to do at the end, after you have the neck recreated. But I tend to fix the issues as soon as they appear.
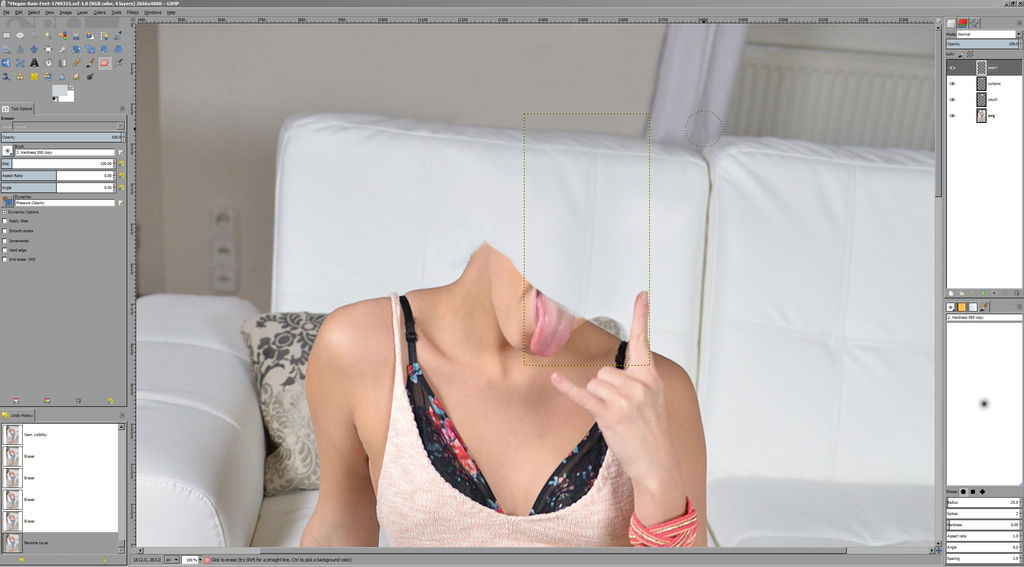
IV. Modelling the neck
1. In this original image, Megan's shoulders are tilted in an odd way which doesn't look very good. So I'm going to cheat and copy a better sample from another image in this series. But even without this source for the transplantation, it would be possible to creat a new neck with the tools described later. Anyway, this is the second image. Use various selection tools and copy the part you want into the clipboard. Here it's just a simple rectangle.
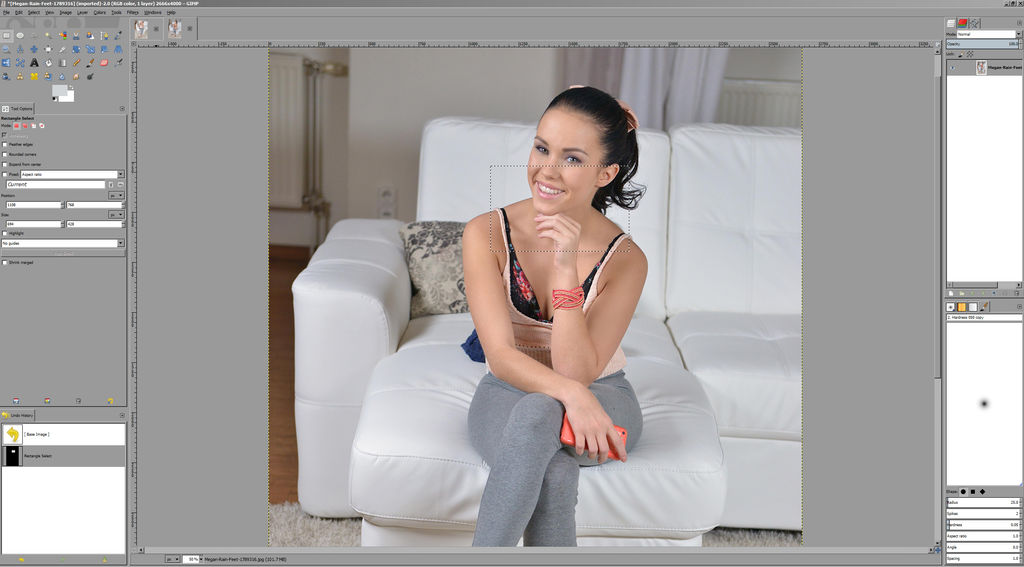
2. Back in the manip, paste as new layer, rename it and make two copies of it. The original pasted layer is backup and the 2 copies are 1 for each shoulder. Turn off visibility of the original pasted layer and of one of the copies.
Let's start with the right side (from our point of view, not hers).
3. Use the Move, Rotate, Transform and other tools to align the pasted neck with the original. Here, we get to use the bra/shirt straps for reference.
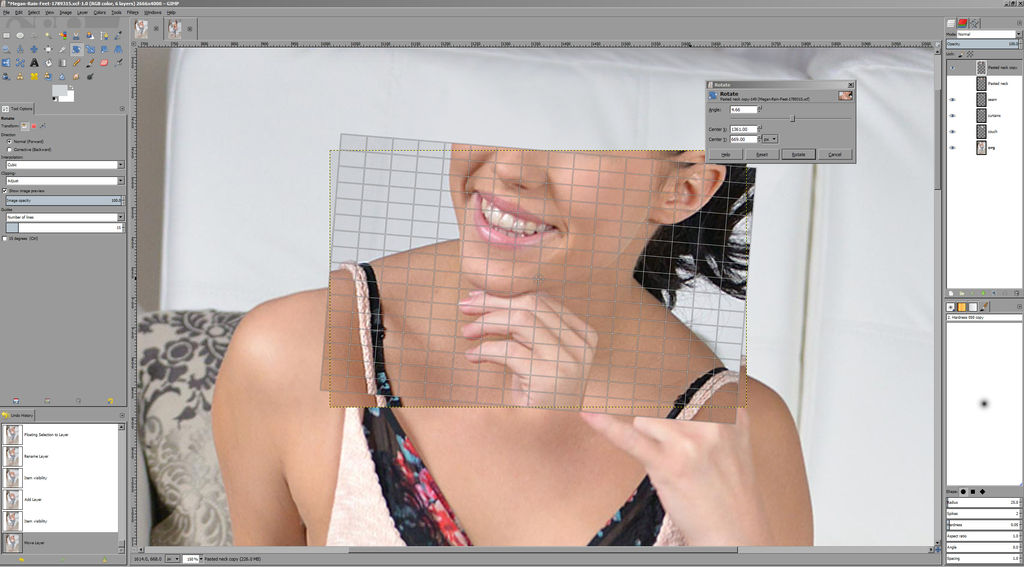
4. You can decrease the opacity of the working layer to better see what you're doing.
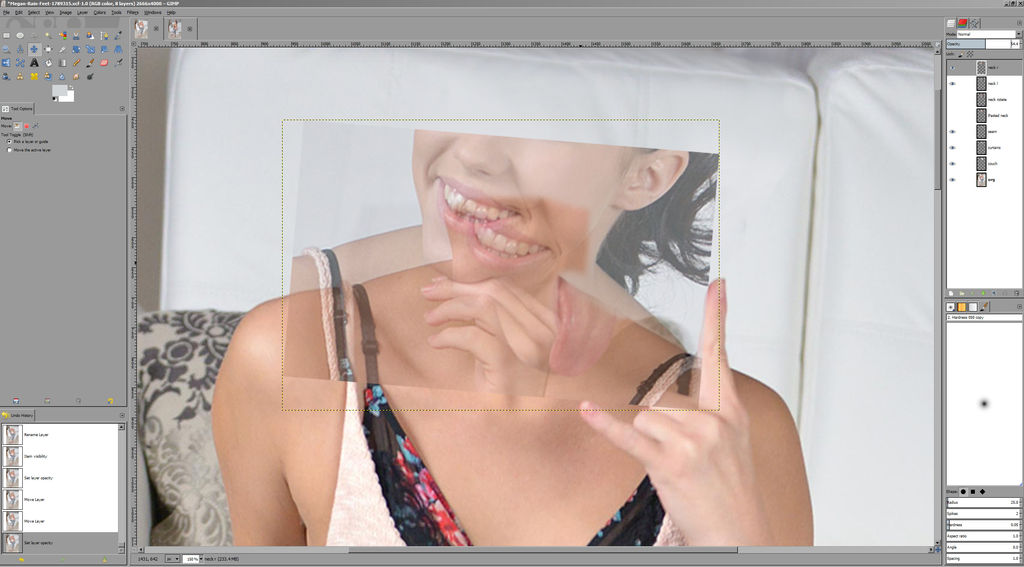
5. Use the Eraser tool with a soft brush (0.15 used here) to delete the parts you don't need and to create a soft gradient between the original and pasted image.
Now do the same thing with the other copy (on the 2nd layer) for the left shoulder. You'll end up with something like this, with both trapezius muscles recreated and some extra stuff in between that will need more cleanup.
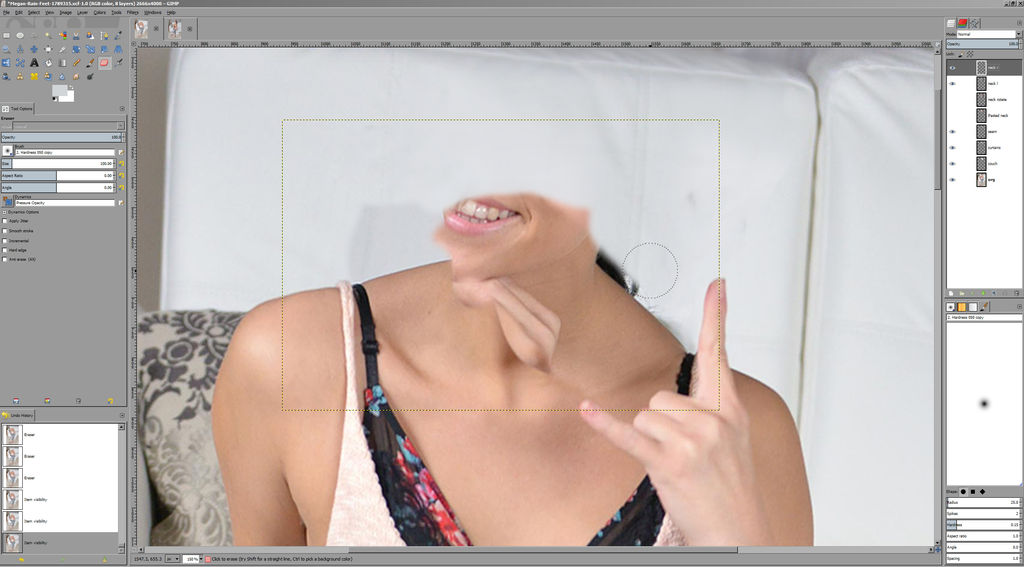
Well and here comes one mess-up. What I didn't do and should have, was to make sure the skin tone looks good. It seemed completely fine as I was working on it in 100% view but unfortunately it's quite a bit darker when zoomed out. What I would've done to fix this had I noticed it in time:
- Combine the two new neck layers into one. As they are right under each other. right-click the first one and select Merge Down.
- Use a color tool of choice from the Colors menu to fix up the skin. I'd probably just use Hue-Saturation with a small change to Lightness, +3 or so. Or Levels or Curves if needed, although these usually don't work that great for this sort of pasted content.
- Perhaps use the Clone Tool with <50 opacity and small soft brush for further touch up.
But anyway.
6. To create a new neck shape, create a path with the desired shape. Start with whatever already exists and keep the path nodes slightly inside ("under the skin"), about 2-5 pixels depending on the image size.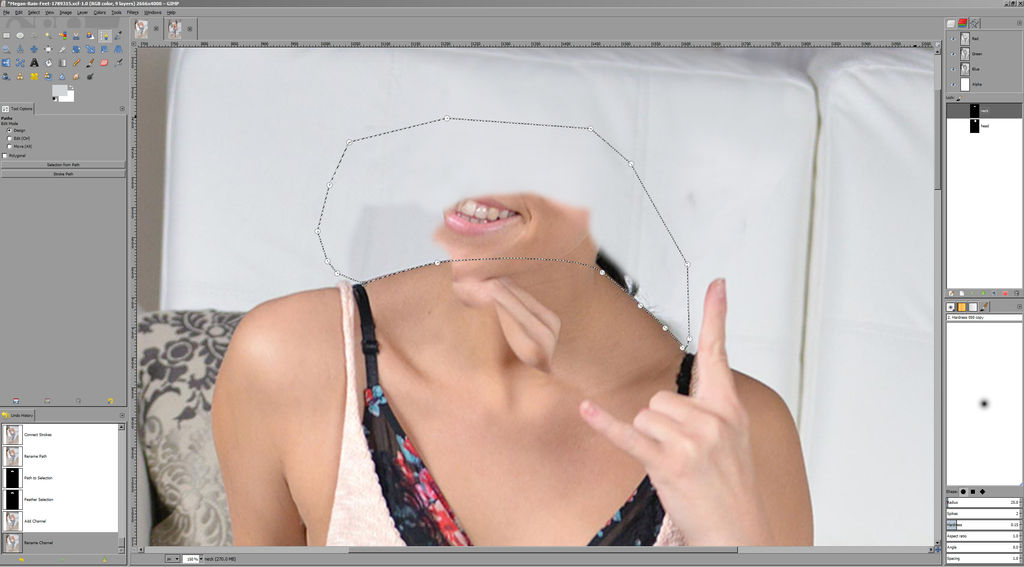
7. Rename the path, create a selection from the path with Feather set to about 3 pixels (2-5 depending on image size and desired sharpness of the edge). Save as a new channel.
You may want to combine the two neck channels into one if you haven't yet (Merge Down).
8. Use the Eraser with 100% opacity and a hard brush (0.80+) to delete the unneeded stuff. Make sure you have the right layer selected. if you have things spread across multiple layers, do each one separately. Since you're working in a selection, there are no worries about deleting something you already accomplished.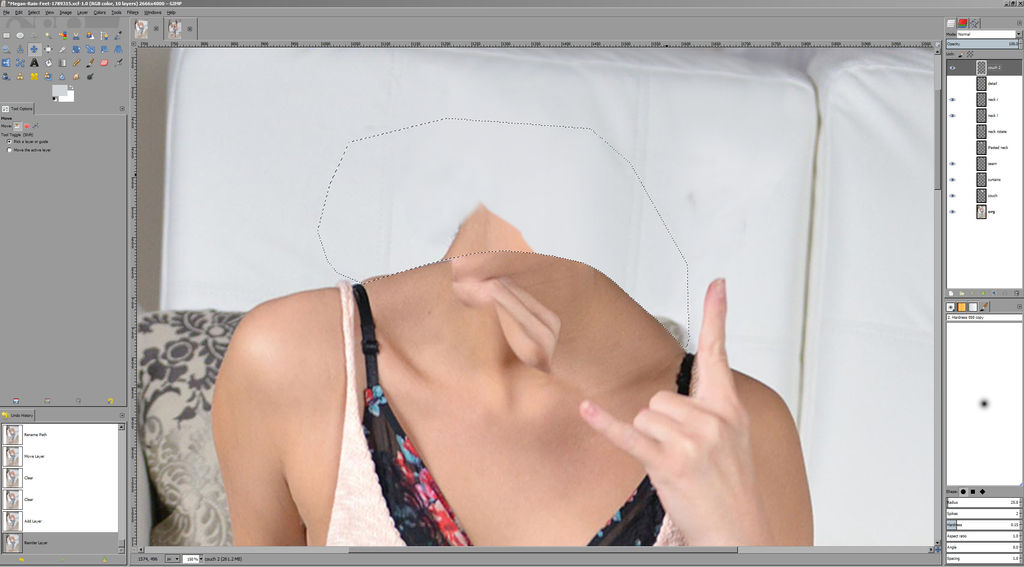
9. Now either with the neck layer, or in a new layer, use the good old Clone tool with a 0.50 or so hardness brush to clone the couch again over that strange pyramid shape that was left over.
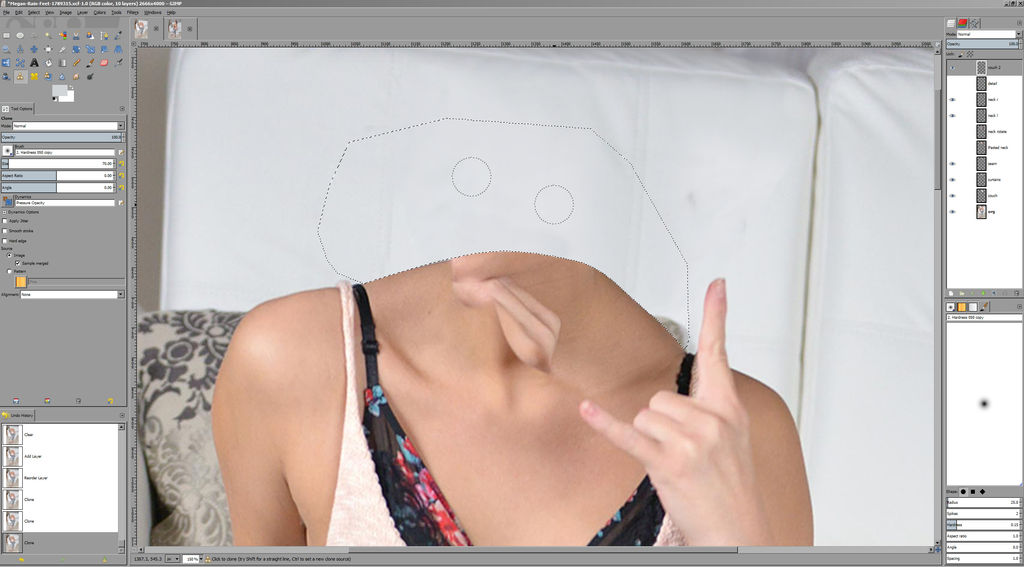
10. Hit Ctrl+I or Select > Invert Selection to... um, invert the selection and start working with the clone tool, airbrush or whatever on the neck itself. Use soft brushes (~0.10) and low opacity (0.30-0.60) most of the time.
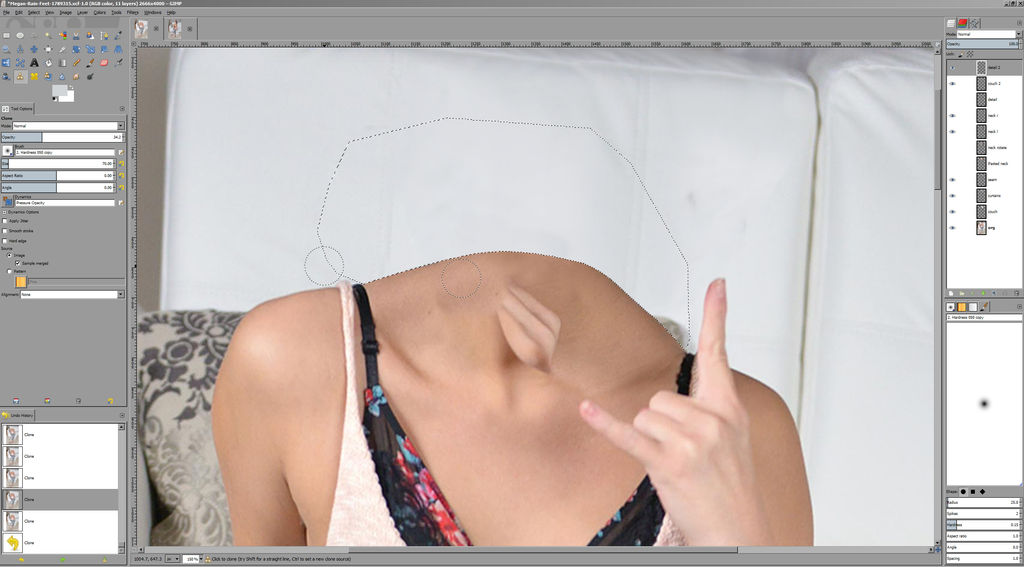
11. At this point I realized the right side of her neck looks weird. Here's where the paths come in handy. If something like this happens, select the Paths tab and the neck path and edit it as needed (or make a new copy of the path and edit that). Then use Selection from Path, Feather etc. and fix up the new shape like in the previous steps.
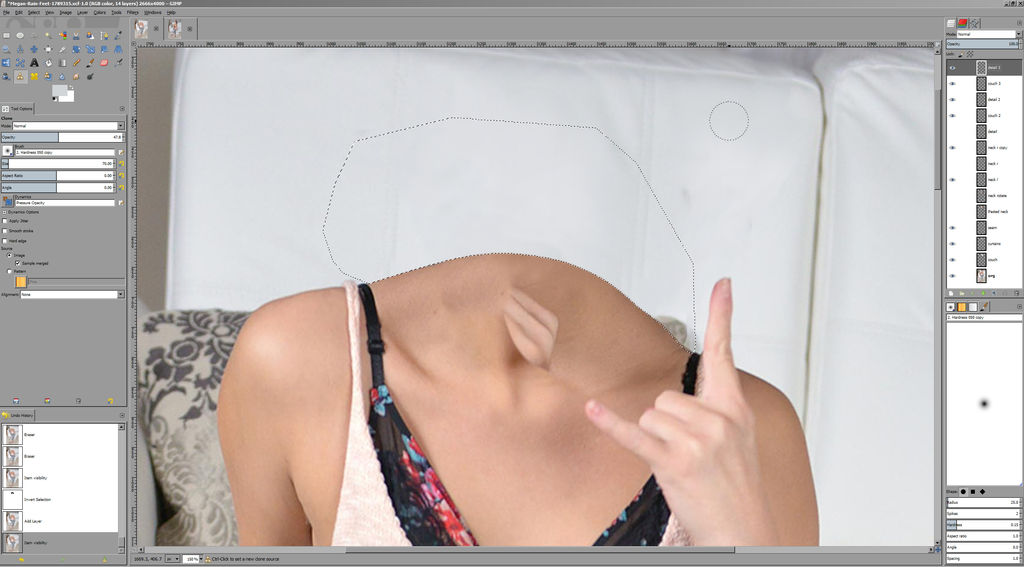
V. Recreate the skin texture of the new neck
1. Clone away the inside of the neck from whatever source is available. There are two main ways to do this:
a) Use 80-100% opacity and use a source such as a shoulder. Shoulders are usually a good source since the skin as well as lighting tend to match. So you can have proper highlights and shadows that's true to the light sources. This would probably work very well here if the original image had Megan's neck clearly visible and her shoulders were not tilted in this way. Such as it is, I rather opted to remodel the neck from new. Sometimes you can even just copy/paste both shoulders and have a new neck right away.
b) Use 30-50% opacity and use short strokes or single clicks to recreate some color and texture. Airbrush will help too. This however will most likely look fake so spend some time to clone from various sources. Anyway:
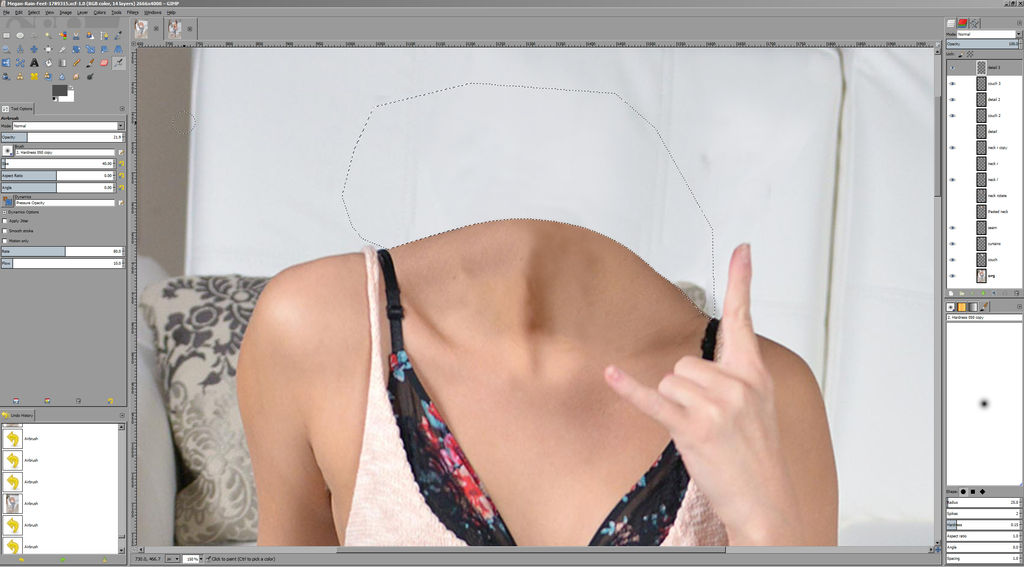
Again, the darker skin tone looks like ass, but it just flew over my head while I was doing the manip itself. When you're staring at an image for half an hour, your brain tends to replace things that exist with things you wish were there. So when photoshopping, make sure to take breaks, look at other pictures, stare at a wall for a moment or whatever to give your eyes a chance to reset. And, again, zoom out and look at the whole image fairly often.
2. If the skin has a fake plastic texture (or rather no texture), a quick and dirty way to add faux detail is noise. Use Filters > HSV Noise. In the dialog, set Holdness to 1 or 2, Hue and Saturation to 0 and value to 20 or more. If the original image is grainy, such as from a phone, you can bump up the hue and saturation as well.
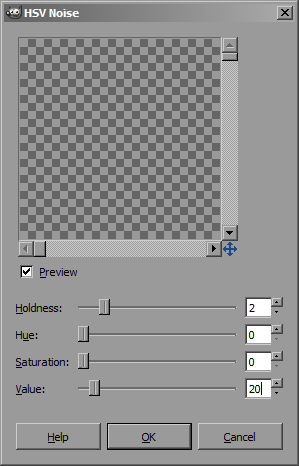
Next, use FIlters > Blur > Gaussian Blur with a value about 2. Instant usable fake skin texture.
Be aware that filters only work with one layer, so make sure to select the right one. If you're getting noise only somewhere, merge some layers into one.
3. If the edge of the new body doesn't look realistic (i.e. it looks like a cardboard cut-out), you might want to darken it a bit. Use the color picker to pick a dark shade of skin, then change the foreground color to a significantly darker shade. Use airbrush with low opacity and a soft brush to darken the edge of the neck. Make sure the selection is set correctly so that you paint only the inside.
You can also use the Dodge/Burn Tool with a Burn setting, but I prefer this method for better control.
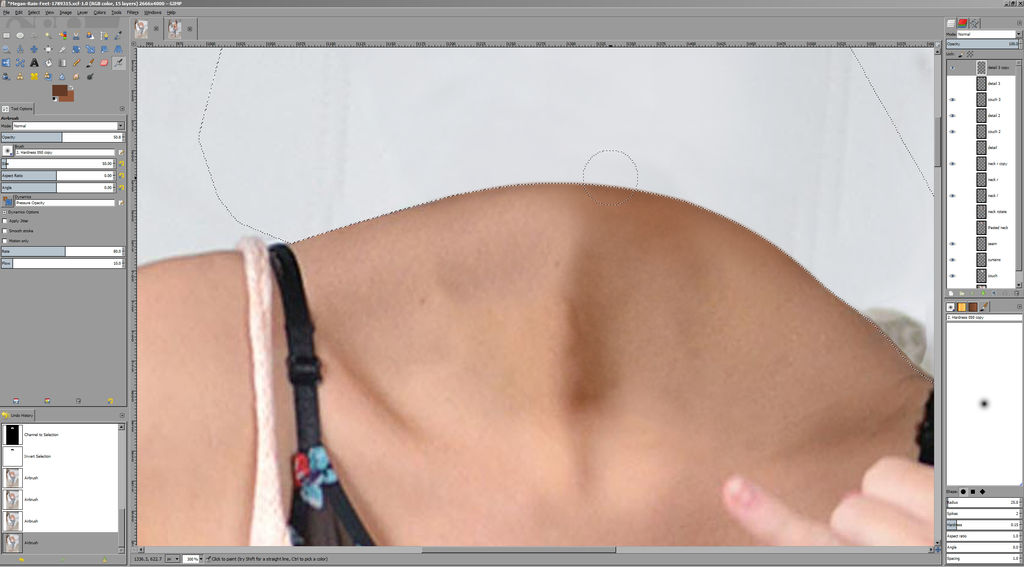
4. If the edge is too sharp, you can go back to the original path, create a selection from it and use Select > Grow by about 2 pixels, as well as use a larger feather value. Then use the eraser (or invert selection and clone) to fix it up.
Now add some caption and you're done. Congrats! See you at the psych ward.

Aaaaaaaaaaaaaaaaaaa why so serious?
If you ask me for a good, fast-paced shooter to blow off some steam, I have one answer for you - the Serious Sam series. The First Encounter blew my mind back in the early 2000 and it's still hilarious today. Second Encounter upped the ante even more and while SS2 was somewhat underwhelming (or just different), SS3 BFE returned to form just at the right time when we were drowning in the military shooters.
Apart from the speed and action, the series is possibly best known for the enemies, in particular the headless sort. Especially the beheaded kamikaze. This guy:

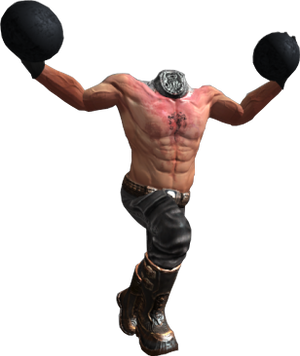

Doesn't that design just scream iconic? By which I mean, of course...
If you don't know what I mean, open the video. I don't think it's possible not to love that.
Perhaps surprisingly for this kind of game, quite a bit of thought went into the background of the various enemies. These guys are executed soldiers whose heads were... lost. (Which kinda begs the question where they went. At least, people always ask me where the heads go. Well, I tend to just discard them but I think "losing" so many heads is a bit odd.) So they received implants which allow for some basic functionality, two bombs strapped to their hands, and a loudspeaker I guess? The bombs are the reason why the explode when killed.
However, the Mental army apparently has obvious disciplinarian problems, thus you get to encounter more executed soldiers. These had the luck that their heads were preserved, so they get to carry them in their hands (the other hand is reserved for some tools of destruction).


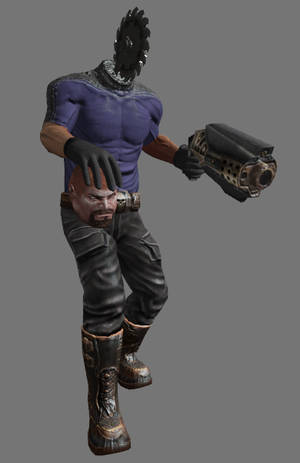

Strangely, I can't find any cosplays of these whatsoever, which is a real shame (any takers?). But the design certainly inspires people:

(Author of the image is unknown, which is deeply regrettable. I'd like to kiss them for combining Madoka Magica and Serious Sam.)
Does it all sound intriguing? Make sure to learn more about the life of the headless heroes!
Well that's it. What else is there to say? Except AAAAAAAAAAAAAAAAAAAAAAAAAAAAAAAAAAAAAAAAAA
More deviant videogame journals:
Red Dead Redemption
Lollipop Chainsaw
SOMA
The Wolf Among Us
